Almost every day I use Redmine as a task manager and a place where I can store my notes. Recently I was looking for a way of configuring Redmine to create issues from emails. There is an official instruction on how to do that. However I have a different Postfix configuration, so I had to change some of described steps. First of all my virtual mailboxes configuration is stored in a MySQL database. I also use PostfixAdmin to easily manage mailboxes or aliases in different domains.
In this post I’ll show you how to fetching emails into Redmine, if you have a similar configuration.
There are 3 ways to receive an email in Redmine: standard input, IMAP/POP3, and forwarding via a mail transfer agent (Postfix, Sendmail etc.). I chose third option because is the fastest one. OK, let’s begin.
Set up an e-mail handler
- Login into Redmine as an administrator, and go to Administration > Settings > Incoming emails, check Enable WS for incoming emails and generate a secret key e.g.
qWeRTYUI34oadfgh3jkl - Save the API key in any file e.g.
redmine-api.key - Add execute permission to a ruby script in your Redmine folder:
extra/mail_handler/rdm-mailhandler.rb(Only if you have web and email server on the same machine as I do. Otherwise you have to copy this file to your email server)sudo chmod +x [redmine_dir]/extra/mail_handler/rdm-mailhandler.rb
- Login into PostfixAdmin and go to Virtual List > Add Alias
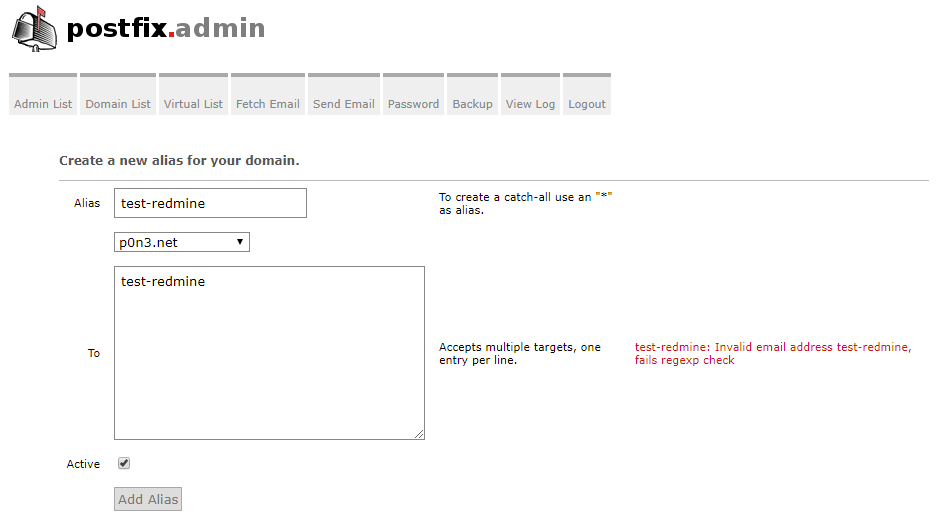
New alias in Postfix Admin - Add new alias. PostfixAdmin validates ‘To’ filed, so you can’t type an address without @domain part:
test-redmine: Invalid email address test-redmine, fails regexp check
Therefore you can type any address and change it manually in the database. - Connect into your Postfix database. PostfixAdmin stores aliases in the ‘alias’ table.
UPDATE alias SET goto = 'test-redmine' WHERE address = 'test-redmine@p0n3.net';
- Add new alias to /etc/aliases file:
test-redmine: "|/usr/bin/ruby /var/www/redmine.p0n3.net/extra/mail_handler/rdm-mailhandler.rb --url=https://redmine.p0n3.net --key-file /etc/postfix/redmine-api.key --unknown-user accept --no-permission-check --no-check-certificate -p sampleproject --tracker Feature --priority normal"
Okay, this step needs some explanation.
We told postfix to executerdm-mailhandler.rbon incoming email totest-redminealias.
|textmeans that mail is piped into a command. I added double quotes, because commands that contain special characters (included whitespace) must be enclosed between them.
Now let’s check script parameters:
--url=https://redmine.p0n3.netURL of your Redmine server
--unknown-user acceptdescribes how to handle emails from an unknown user (accept means that new issue will has anonymous user as author)
--no-permission-checkdisable permission checking when receiving email
--no-check-certificatedisable checking server certificate
-p sampleprojectname of your project in Redmine
--tracker Featurename of the target tracker (Feature, Bug, etc.)
--priority normalpriority of created issue
--key-file /etc/postfix/redmine-api.keyfull path to a file that contains your Redmine API key. I used this option instead of--key=[API key], because e.g. in case of error the key may appear in the mailer daemon message.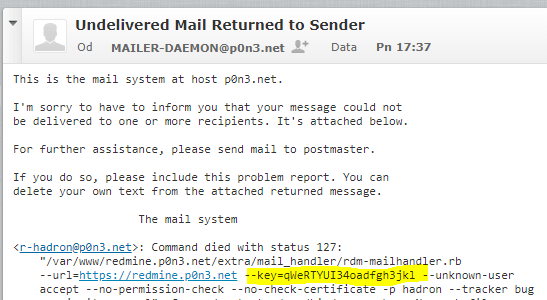
Mail Daemon response that reveals the secret key - Create Postfix alias database (or you can use
newaliases)sudo postalias /etc/aliases
- Add mapping line to the
/etc/postfix/transportfiletest-redmine@p0n3.net local:
- Create Postfix lookup table
sudo postmap /etc/postfix/transport
- Add transport map to the
/etc/postfix/main.cffiletransport_maps = hash:/etc/postfix/transport
- Restart postfix
sudo systemctl restart postfix
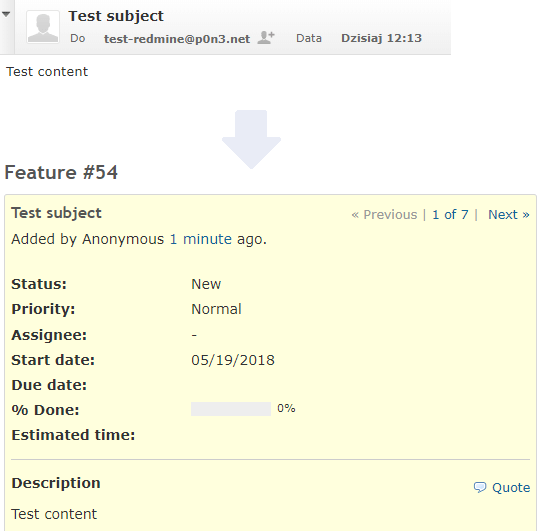
That’s it. Now, to test the configuration you can send an email. I hope someone find this instruction useful 🙂
Problems
Debugging
If you have some problems with that configuration, I recommend you to add -v option to selected daemon definitions (e.g. smtpd and transport) in the /etc/postfix/master.cf e.g.
smtp inet n - - - - smtpd -v
Now, after restarting postfix you should have more information in /var/log/maillog
execvp …/extra/mail_handler/rdm-mailhandler.rb: Permission denied
If you use a Red Hat based distribution like Centos, you might have to add permission to SELinux configuration.
Command output: /usr/bin/env: ruby_: No such file or directory
Postfix local daemon always reset the PATH environment variable to a system-dependent default path, so make sure you have /usr/local/bin/ruby in your alias command (see point 7).
Leave a Reply